Output
Description
In the Output tab, you can configure proxy export to a file, a local server, or an FTP server.
Control Panel

New Task
The New button lets you create a new rule for exporting proxies. After clicking it, a window will open where you need to choose where you want to export the proxies.
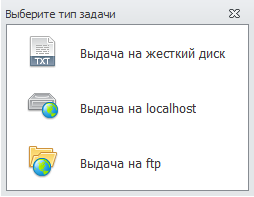
Export to hard drive — exports data to your computer’s hard drive.
Export to localhost — exports data to a local server.
Export to FTP — exports data to an FTP server.
Each type is described in more detail below.
Edit
This button allows you to edit an existing export scenario.
First, select the desired scenario, then click Edit.
Delete
Deletes the selected scenario.
Export to hard drive
After clicking the Export to hard drive button, a window with export settings for your device’s hard drive will open.
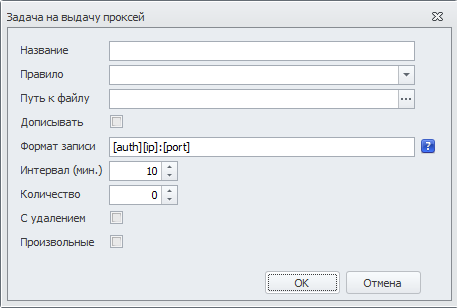
Name — enter the task name here.
Rule — select a rule for filtering proxies. You can read more about rule configuration here. If you leave the Rule field empty, all live proxies will be saved to the list.
File path — the path to the file where proxies will be saved.
To choose the save location, click the button with three dots.

Append — if checked, new proxies will be added to the file as they are parsed.
If this option is disabled, the file will be overwritten.
Output format — choose the format in which proxies will be written to the file.
By default, the format is [auth][ip]:[port].
Format reference:
[ip] — IP address
[port] — Port
[real_ip] — Real IP
[type] — Proxy type
[white_list] — Presence in blacklists (true — not listed)
[time_check] — Check time
[latency] — Proxy latency
[time_now] — Current time
[country] — Country
[country_code] — Country code
[login] — Login
Interval (min.) — how often proxies will be exported (in minutes).
Quantity — number of proxies to export (from zero to unlimited).
With deletion — whether to remove proxies from the live list after taking them.
Random — if selected, random proxies will be taken; otherwise, the first ones in the list.
Export to localhost
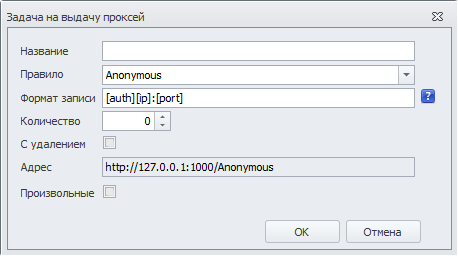
When this mode is selected, a local web server will be launched, and you will be able to get proxies by following the link in the Address field.
Name — specify the task name.
Rule — select a rule for filtering proxies. You can read more about rule configuration here. If you leave the Rule field empty, all live proxies will be saved to the list.
Output format — choose the format in which proxies will be exported.
By default, the format is [auth][ip]:[port].
Format reference:
[ip] — IP address
[port] — Port
[real_ip] — Real IP
[type] — Proxy type
[white_list] — Presence in blacklists (true — not listed)
[time_check] — Check time
[latency] — Proxy latency
[time_now] — Current time
[country] — Country
[country_code] — Country code
[login] — Login
Quantity — number of proxies to provide (from zero to unlimited).
With deletion — whether to remove proxies from the live list after taking them.
Address — URL where proxies will be provided (generated automatically based on the selected Rule).
Random — if selected, random proxies will be returned on each request; otherwise, the first ones in the list.
Export to FTP

Name — specify the task name.
Rule — select a rule for filtering proxies. You can read more about rule configuration here. If you leave the Rule field empty, all live proxies will be saved to the list.
Output format — choose the format in which proxies will be exported.
By default, the format is [auth][ip]:[port].
Format reference:
[ip] — IP address
[port] — Port
[real_ip] — Real IP
[type] — Proxy type
[white_list] — Presence in blacklists (true — not listed)
[time_check] — Check time
[latency] — Proxy latency
[time_now] — Current time
[country] — Country
[country_code] — Country code
[login] — Login
Quantity — number of proxies to provide (from zero to unlimited).
With deletion — whether to remove proxies from the live list after providing them.
Random — if selected, random proxies will be exported each time; otherwise, the first ones in the list.
FTP Server Settings
Server — Server address
Port — Server port
Protocol — Server protocol (FTP or FTPs)
Path — Path to the file on the server
Login — Server login
Password — Server password
Connection test — shows the test result (successful connection or error)
Scenario List
After you configure a scenario and click OK, it will be added to the general list, where all available information about it will be displayed.
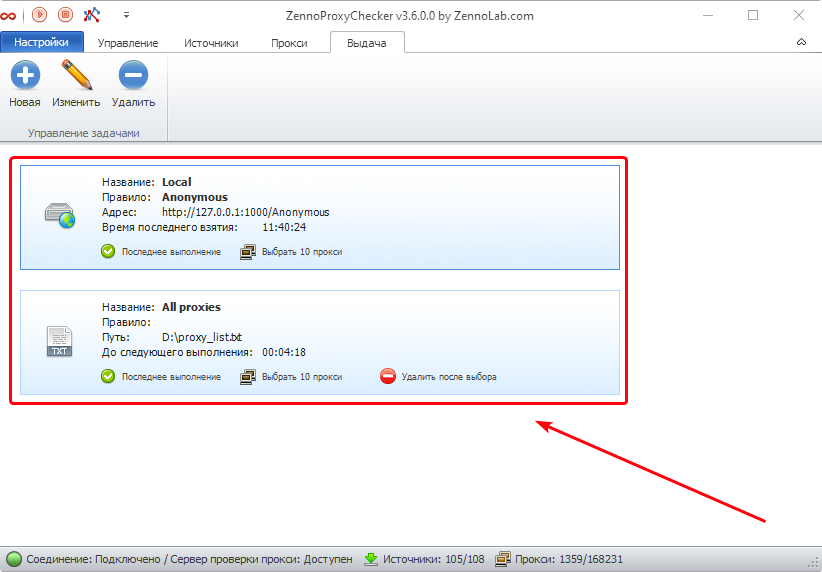
Pay attention to the Last run status. Possible states:
Green — at least 1 proxy was provided during the last task run.
Red — no proxies were taken during the last run.